Tuesday 27 August 2013

NOTD Dandelion Nail Art

I've been missing doing nail art lately and after seeing a really cute design on Glossy boxes twitter page I decided to have a play around.

After a bit of googling (glossy box didn't credit the person who did the nails) I find the cute design was done by Mad Manis (blog here). She's got some great nail art designs on her blog so next time I need inspiring I'll be going back.


I love how simple and cute this design is (I need a steadier hand it would seem)


I really like the sky grey/blue shade used as a base but didn't have anything similar so mixed some. I started off with a base of OPI Dating a Royal (which is a colour I absolutely adore. I forgot to photo this so used an old photo)

Untitled

Next I put a layer of No7 grey skies on top.

Untitled

And finished with a coat of Avon Blue Water Lillies. This deepened the Blue Water Lillies coloured.

Untitled

For the desigin it's self I used my models own nail art pens. Disappointingly though my black pen has become blocked and doesn't work anymore so I has to use a cocktail stick which is why my black is a little messier than I wanted. 

Untitled

I painted 3 nails with black sticks towards the tip of the nail. On top of the black sticks I then painted thin strips of white to look like the head of the dandelion.

Untitled

For the other nails I painted a few wishes on them to look like the dandelions had been blowing. I did paint my top coat too soon and smudge them a bit.

Untitled

I really like this design and really want to try it again and get it a bit neater like the brilliant original.

Are you a nail art fan? Is this something you'd try?

Love M

xxx


SHARE:

Sunday 10 February 2013

NOTD: Valentine's Day

With Valentine's day on Thursday we thought we'd post some ideas for cute nail art. Any excuse for us to play around with our nail polishes collections as we are both huge nail polish addicts.

L had picked up a cute Nicole by OPI polish called Have a Heart which is just perfect for Valentine's nail. It's a pretty fine clear glitter that has pink foil hearts suspended through it. 


Over the top of a Essie Lovie Dovie which is a gorgeous medium pink nail polish the hearts really stand out.


As with a chunky glitter and other polishes similar to this to achieve the even effect with the hearts it works best to more dab them on from the brush.


It gives a really cute effect and is perfect for Valentine's day! 
From looking online this polish now seems a rare one! It may be different in the US but if you want this ladies I could only find 3 bottles of it on eBay.

Lately I have been back to biting my nails. I'm so annoyed at myself but just can't seem to stop. Back to the bad tasty polish and stuff I think. Any tips let me know.

For now I tend to keep false nails on as much as possible as it means I can't bite them. I stuck some on Tuesday and was playing around with some designs. After those come off I have bit my nails so low I can't put false ones on at the moment so I only have my playing around ones to show you all.

Image from Get Nailed Facebook.
I had to share this with you. I've recently found this on Facebook. You can like her page here. She hand paints the most amazing nail art designs for reasonable prices and does amazing phone cases too. Once the spending ban is over I'm going to be ordering from her. If you're quick she has a competition to win these ones going on till tomorrow (Monday 11th)

Anyway when I saw these nails I was totally inspired. Especially by the heart tips. I love the simplicity of it.

I started off with a base coat of OPI I'm Not Really a Waitress. I got this in the best of the best collection a few years ago from my other half (who told me the other day he wanted to be referred to as A if I have to blog about him) I tossed this colour aside. It was one of those I didn't swatch and decided from the bottle I wouldn't like it. Something about it in the bottle made me think of a colour for my mum more. I mean a shimmery metallic darker red didn't scream put me on your nails.


I missed judged it. On the nails I love it. It comes out as such a gorgeous shade of red. Bad M judging nail polish on it's colour in the bottle. I was impressed with the quality. After one coat it was perfect but I went with two out of habit.


I tried to use my white Model's Own nail art pen to draw heart tips. Who knew that would be so hard. I didn't like the way it looked so I tried to cover it with glitter. I still didn't think it looked that good. I love the way it looks on Get Nailed's nails but on mine I couldn't get the shape right.


So I tried something different, a little simpler and it worked a lot better. I think this would look cute on just the thumb and ring finger. I used the Nail Art pen again. You could use a dotting tool or kirby grip just as easily. I used three dots to get the heart shape. Sometimes simple is best.

Something I may have to try for my nails though is this design from Polish You Pretty.


I really love how cute this looks.

Hope you like our ideas.

Love M

xxx


SHARE:

Monday 29 October 2012

NOTD: Halloween Theme!


Aaaaah Halloween week! 

We love a theme and what better than scary spooky Halloween?!

We went a little nail crazy with ideas and decided to put them all on one post so you can see for yourself and hopefully get some different ideas!

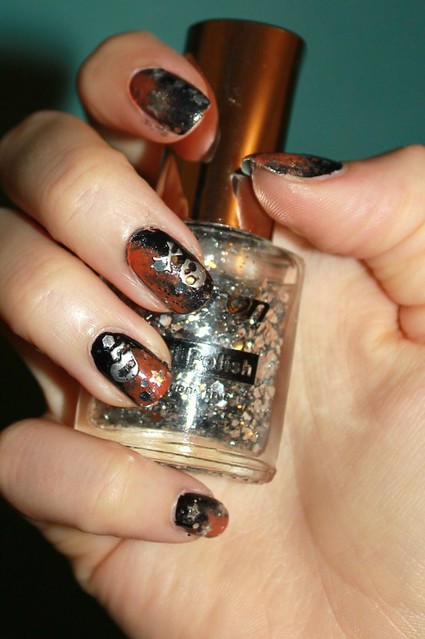
First up is a galaxy nail style design:


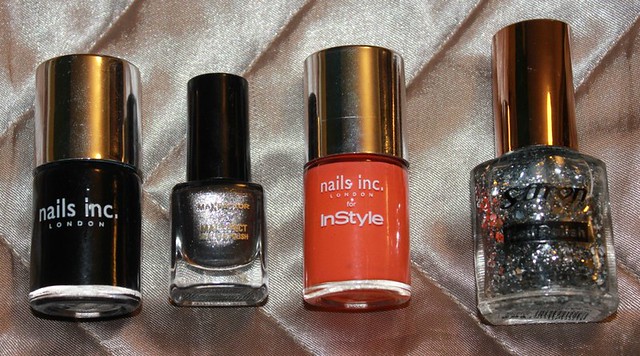
I used the following polishes:

Halloween Nails

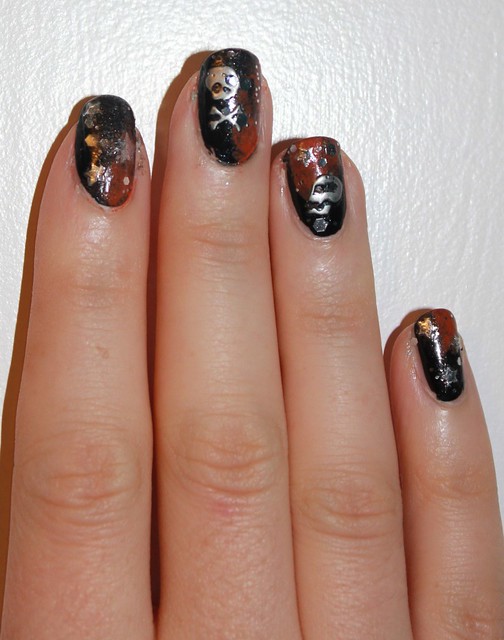
Nails Inc Black Taxi was the base coat, with the Max Factor Silver and Nails Inc orange from in Style sponged on top in galaxy style. I then added some stickers from the picture below (Andrea Fullerton at Superdrug) and then the Saffron glitter on top.

Halloween Nails

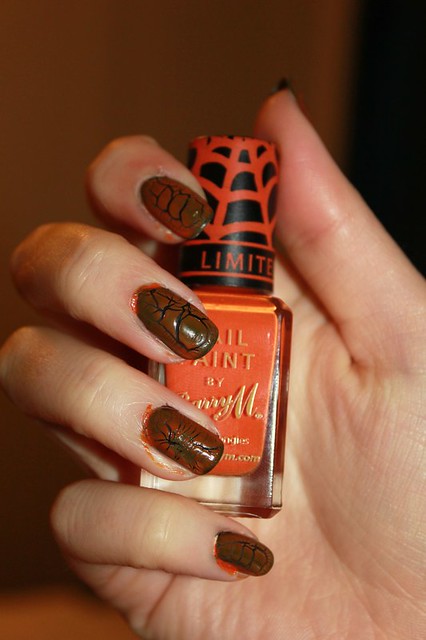
Barry M Halloween

It was a nice relatively easy style to do and a little different!

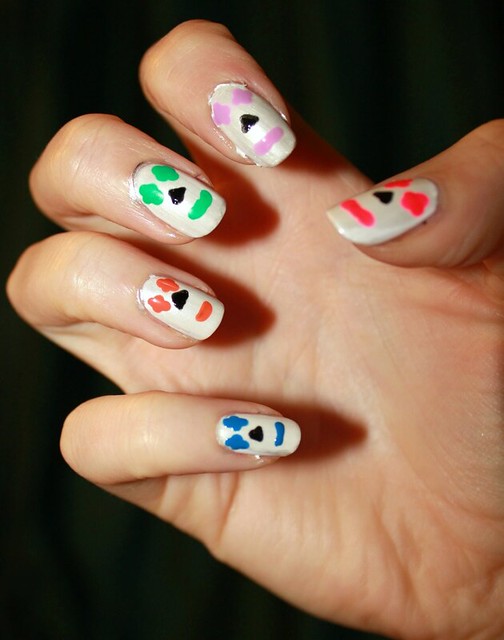
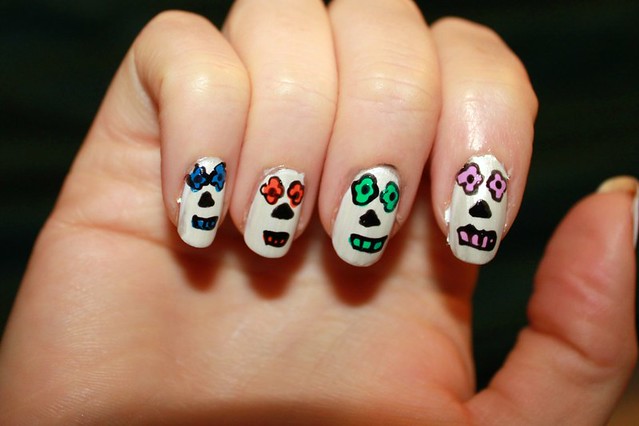
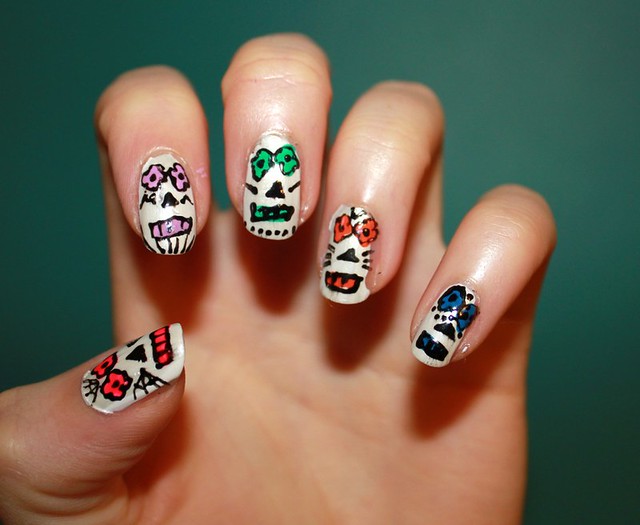
Next up I attempted to do my own spin on the Sugar Skull nails which was SO MUCH fun:

Skull Candy Nails

I started off with a white base coat which looked a bit flat so added on a shimmery white polish on top.
Then I used Models Own black nail pen to draw on triangles for the nose so I could keep the whole face as central as possible:

Skull Candy Nails

After this I used my dotting tools using the largest dot and applied the eyes and mouth using this.
I used 5 different bright colours on each hand, using 4 big dots to create the eyes followed by a line (of sorts!) for the mouth, as shown below:

Skull Candy Nails

Then I used the pen again to outline the eyes and putting a dot in the middle, and also lining the mouths and creating some teeth.
To make my own little spin on this I then added in a few dots, lines, squiggles etc so mine ended up looking a bit tribal!
I loved this design and it was definitely my favourite.
I had so many compliments, even from men serving me on tills in Superdrug and Tesco!
How random.

Skull Candy Nails

Skull Candy Nails

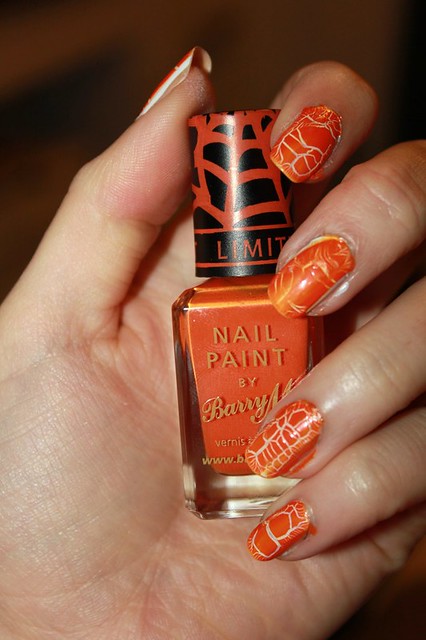
The last of my designs features a somewhat gimmicky polish from Barry M.
I've been using black and white a lot lately so picked up these colours from Barry M in Superdrug, and currently their promo is when you buy 2 products you get their limited edition orange 'web effect' polish for free.
I would never have bought this but as its a freebie the blogger in me wanted to give it a go:

Barry M Halloween

Barry M Halloween

As you can see it is different to a crackle effect, but not really producing a web effect!

The white does look pretty effective but the polish isn't opaque enough to cover the black polish sufficiently enough for you to see it, so this was a bit of a let down in my view and i was glad it was free!

Hope you like my designs!
Which one do you prefer?

L xxx

Today's post is a little late going up! I'm currently mourning the loss of the Ciate Advent Calender that was never meant to be I guess. No nail varnish everyday of December for me!

Anyway onto my Halloween nails. L's sugar skulls are my favourite. I was so impressed when she sent me photos of hers! I decided to have a go at a spooky castle type of nail art. Please ignore my grown out acrylics. They have been removed tonight!

I started off with two coats of Max Factor Max colour effect in shade cloudy blue (which isn't a cloudy blue shade at all) to creat a dark night sky. It reminds me of OPI Russian Navy. I really like the formulation of this polish and one coat was opaque but I did two for good measure.

On top of that I applied my new Sally Hansen polish I picked up in American in the shade glass slipper. I love the colour of this and the way it looks on the nail. It gave it a really starry night effect and you get so much glitter in one coat.


Partially as I wanted to try another new colour (OPI Altar Ego) and because I wanted it to look a little more foggy and spooky I applied a thin coat of Altar Ego which is a pearly white shade. I'll be interested to see what this looks like on a bare nail.


I really liked the effect and colour the combination of these three gave on the nail and I can't wait to use Altar Ego and Glass Slipper over different shades to see what they look like.

Once my nails were dry I used my Models Own nail art pen in black to drew the castle outlines.


I filled them in using the nail art pen too. I really need to invest in a good black nail varnish. I'm regretting not picking up OPI Black Onyx. What's your best black polish?


I then used OPI You Don't Know Jacques to draw a thumb on my nail and OPI My Pointe Exactly to create windows and my white Models Own Nail Art pen to Add a moon. 


Then using my Models Own Nail art pens I added details to the door, a cat and a ghost in the windows and some birds in the sky and on the moon. I like to think of them as Ravens.


and a close up of the thumb.


I wish they'd turned out a bit neater. I need to steady my hand more but overall I quite like them.

Have you tried Halloween Nail art?

Love M

xxx


SHARE:

Thursday 23 August 2012

NOTD: Catwoman Inspired Nails

So I don't know about you, but I absolutely LOVE me some super hero films.

I loved Avengers, I love all of the Spiderman, Hulk, Thor and all the previous Batman films.
I'm not really that girly when it comes to film watching, I'm ten times more likely to see action with a buff man in than I am to see a romance like the Notebook.

Needless to say then, I absolutely loved The Dark Knight Rises and was so excited for it to finally come out, especially with the Tom Hardy/Christian Bale muscle show!

After I saw it however there was one thing on my mind (in the nicest way possible)...Anne Hathaway as Cat Woman.
Quite frankly I think she looked unbelievable in her leather cat suit and she's currently my motivation to go to the gym and replace stuffing myself with cake and ice cream with fruit and salad:


How is it that she can have such a tiny waist!
I read somewhere that she spent 10 months in the gym, good on her!


With this in mind, I decided to do my take on Cat Woman inspired nails

Here's my final result!


I went for simplicity over cramming too many details in.
I like that if you think about it, you can probably work out what the nails are about (if you are into the film as much as I was!)


Basically I used the black crackle from Barry M to paint 4 of my nails and the red colour to paint my ring finger.
The black crackle layered up looks great as a nod towards her leathers as they have some kind of pattern put to them which you can see in the pictures above.
The red is of course a nod towards her red lipstick, which she has for most if not all of the film.


I also covered all of the nails with a matte top coat.
Her cat suit and lipstick are both matte finish and I felt this would look better than a shiny top coat.


Lastly I used my new Model's Own nail art pen in white to add dots in a half moon shape at the base of my middle finger nail.
This is as you've probably guessed a nod towards the pearl necklace that she steals/wears during the film.


I couldn't find any other Cat Woman style nails but I hope this is something different to any others that are around.

What do you think of them?
Simple and enough? Or would you have added more?


Also....HAVE YOU SEEN HER SHOES?!
Those boots are to die for. But obviously strutting around Uni wearing these might cause some suspicions!


I'm going to give a very subtle hint that you should come back and check our blog tomorrow, as we have some AMAZINGLY EXCITING NEWS that I can (almost) guarantee you will love.

All will be revealed at 9am tomorrow, but you should definitely check back!

L xxx

SHARE:

Monday 23 July 2012

NOTD - Tuxedo Nails

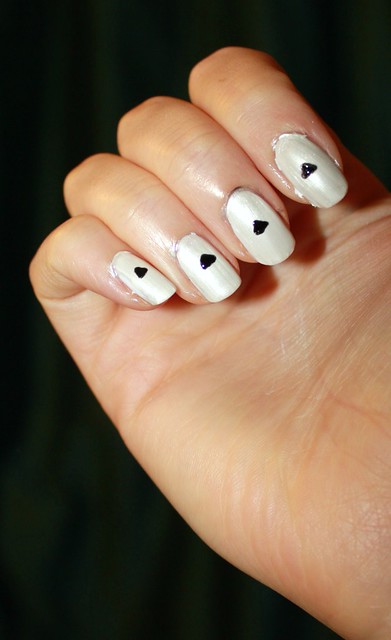
So Day 2 of our 21 days of nails! Today I'm showing you tuxedo nails. Everyone went crazy for these after Zooey Deschanel was spotted with this very cute manicure on the red carpet. I'm a little behind and decided to give it a try last Saturday as I was wearing a nude and pink dress and wanted some nail art to blend with it.


As I'm yet to own nail art pens (I use my dotting tool) and I don't have a steady hand I decided on a feature nail. You'll notice I favour this manicure a lot through these nail posts.


Firstly I painted a base coat of OPI Nail Envy Maintenance (the best at the moment for me) then I painted all of my nails with two coats of  OPI bubble bath. Its a gorgeous slightly sheer nude pink. Even though it's sheer I actually really like the colour which surprised me. It applied easily. I have the small bottles as I have the best of the best collection ( a great set of 10 mini OPI polishes in their most popular shades. I fully recommend it.)


When it was completely dry I started by doing the bow tie. I did two little triangles and a dot for this. You could use a kirby grip if you are like me and don't have nail pens. (I should add yet, as I don't think I can resist the Models Own stand much longer) I used OPI Lincoln After Dark for this. I always use this for my dark colour in nail art as I don't own black nail varnish.

Excuse my disgusting stubby nails, I bit all this hand the other day, naughty me!!

Then using my dotting tool I did 3 dots for buttons and used the brush in the pot for two triangles at the side. I really like this look and will definitely do it again.

Did you try this manicure before? Would you try it again? I think nail art pens would make it much easier.

Love M

xxx

SHARE:

Sunday 19 February 2012

NOTD

I was trying to give my nails a break and just use OPI nail envy but after 2 and a bit weeks they looked so bland and I had to paint them today. The other day a lovely twitter follower sent my some nail varnishes. Including in the ones I got sent was an essie one I was dying to try out. 


I absolutely love the essie polish (shade aruba blue) and can't wait to buy more (hopefully I can get it cheap in the uk) the formula was amazing, opaque in one coat but I two to be on the safe side. It has a small brush (not like the one stroke polishes) which I personally prefer as I find it easier and it has a handle I can actually grip, I love my models own and nails inc nail varnishes but find the tops hard to hold.

SHARE:
© The CSI Girls. All rights reserved.
Blogger Designs by pipdig