Monday 30 July 2012

NOTD OPI Big Apple Red

A simple NOTD from me today. A gorgeous cherry red. A classic colour everyone needs in their collection. This is OPI Big Apple Red. I adore the name, so cute.


Formula wise this needed 3 coats and was also a little sheer. I found you colour still some some nail lines on a few nails. I expected more of an opaque colour.


It is a really lovely shade of red which is winner for me. But the formula did disapoint so I don't know if I'd buy it again. When I wore this it also chipped really quickly. Under a day quick. Has anyone else got this colour and found this?


Showing where you can slightly see the nail line.

This is such a pretty colour I'm in the process of experimenting with different top coats.

Do you have a favourite red in your collection? I wish I could make this one last longer. Any tips on making it last better?

Love M

xxx

SHARE:

Sunday 29 July 2012

NOTD: Olympic Inspiration

Day 8!

This is a collection of Olympics inspired nail art from the both of us.

As I type this I'm sat watching the gymnastics! I love the Olympics, I sit day dreaming, I love watching the gymnastics and swimming the most. I always joke to my mum she let me give up on activities too much as a child, she wasn't a pushy parent in the slightest we chose what we wanted to do and when we wanted to stop. I like to think if she had pushed I'd have been good at something by now ;).

So I decided it was about time I tried a tape manicure. I love the look of them. I'm current waiting for nail tape to arrive in the post, but as it's an eBay special from Hong Kong I know it's not coming any time soon so I thought I'd give a DIY one a go and use sellotape.

This type of manicure requires patience and time. Perfect for doing when you are sat watching the Olympics.


I started by picking the colours I wanted (the colours of the Olympic rings and the GB flag) and cutting as thin as I could strips of sellotape. You need lots of these, between 3 to 4 per nail.


This is part of wear patience is needed.


Next step is to paint the nails in the colours selected. I decided on my thumb and ring finger to be Great Britain flag colours and did random marbled spots on them. For the other fingers I did the colours of the Olympic rings in the order they occur.


You don't need to worry about being too neat.


Next step is to apply strips of tape to the nails. Make sure your nails are really dry before you do this stage of you'll end up ripping paint of as you peel them later. I did this on some nails.
I do them diagonally in a random pattern. Thin strips and four per nail I found looked best.


Next pick the colours you want to go over the top. I choose black for flag colours and white for the Olympic ring colours. Don't worry about being too neat. Just make sure it;s well covered.


Once that coat is completely dry remove the tape carefully and in the opposite order to which it was laid down to avoid excess tugging. As you peel back strips you'll feel if there is another on top. Now to clean them up with a cotton bud and apply top coat.


 The finished effect. I can't wait to try this again. I've seen it look great with a gradient neon nail and black on top. What do you think of the tape manicure? Some of my strips were too thick. I think the middle nail looks best. Do you have Olympic nails?

Love M

xxx

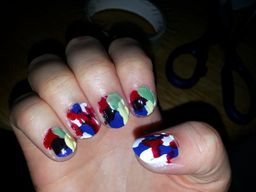
It's my first proper time at nail art and I totally went for it!
I spent my time during the opening ceremony doing mine so I could get as much of the stuff in as I could!

I thought the ceremony was completely bizarre and crazy and by the end of it I totally loved it!

The music, Mr Bean and good old Bond and Queenie were amazing!

So anyway onto the nails:

This is look no.1

I had so much fun doing this. Originally I didn't even own a blue and I've no idea how this happened but I had to buy one ha.
Union Jack in gold (as we're going to win some!), a medal, my attempt at a torch...., proper union jack and the olympic rings on a gold glitter background.

I used a mix of China Glaze, Models Own and Rimmel colours. 


This was my favourite nail! When I didn't have a blue I tried it out and loved it!
I'm going to be wearing this on my thumb for the entire time the Olympics are on!
I used Model's Own Champagne for this with the white from the Barielle Bridal Collection.

My 2nd look is a lot less complicated:


I simply painted my nails with the same gold (determined were going to be winning some medals!) and then painted each nail a different colour from the Olympic rings starting a few millimetres above the cuticle.

This lets the gold from underneath shine through which looks amazing!
And it's really easy to get a smooth curve after a few tries.

Hope you like my Olympic nails!

L xxx


SHARE:

Saturday 28 July 2012

NOTD: Essie Sand Tropez

Day 7!

Today's NOTD is my very first and only Essie nail polish so far to grace my collection.

After using this for a few weeks I can guarantee it won't be the last and many more will be joining it!


I bought this as I'd heard rave reviews on it from the blogosphere.

It's the one and only Sand Tropez.

Initially when I got to the shop (called Ulta, another American store very similar to Sephora) and found the polish I couldn't really believe that it was anything special and doubted my choice...


But I used the tester to try it on one of my own nails which happened to be in another pinky nude at the time.

It was a perfect comparison, this was an amazing colour that actually suited my skin as I never thought that it would.
Normally pinky nudes are all that will suit my skin tone but this was one of those perfect beige creamy nudes that seem to complement almost every tone.


I also love the name of this, I would love to live in St Tropez, both the place and the product so this was destined to be mine really!


You can see the colour on my nails above.

This was after two coats and it seems to last quite a bit longer than others (like 4 days?) before chipping which seeing as I work in a lab and am constantly bashing things with them is pretty good for me.


The only downside to this polish is that on some nails it did need 3 coats where it was a little streaky.

The nail polish doesn't seem to be a streaky product but occasionally there will be a gap on a nail that will need an extra coat which is a little annoying as they are a more expensive nail product that you wouldn't have thought would have a streaky formula!


However this has most definitely not put me off it and I still wear it all the time, I'm a big fan of nudes and greiges and fully intend on stocking up my collection with them asap!


What do you think of Sand Tropez? What's your favourite Essie colour?

I might have to add it to my list!

Hope you check back tomorrow, we've got a super exciting nail art inspired by the Olympics which we're hoping is different but just as good as everyone else's ideas as there already some gorgeous ones online!


L xxx

SHARE:

Friday 27 July 2012

NOTD Barry M Magnetic Nail Polish in Burgundy

Olympics start today, we are both currently experimenting with some hopefully olympic / team GB nail art for tomorrow and Sunday's post.

Today's post is another new nail varnish from the ones I picked up the other day. I can't comment on how long it lasts as after painting my nails I decided the colour was more wintery than summery so didn't keep it on long.

I was so excited after L bought me back the China Glaze Magnet (post here) I couldn't wait to buy a nail varnish to try it with. Since Barry M released them I had been meaning to try the Burgundy one as it's such a gorgeous shade. I can see this getting lots of wear in colder months. Plus it's only £4.99 (I will definitely get more come winter) and does come with it's own magnet. Surprisingly this is my First Barry M nail varnish. I'm very impressed so far. (I'm eyeing up their limited edition Britannia Glitter one, it's lush!!!)


Firstly I need to apologise for my messy painting. I was just playing around so didn't tidy up around my nails as wasn't planning to keep it on but the colour was so pretty I has to share. I can see this colour getting so much wear around Christmas time as it's a gorgeous berry red shade.


Firstly paint all nails with one coat of nail varnish, you could stop here. A gorgeous metallic berry shade and opaque in one coat. Then paint one nail at a time with a second coat and hover the magnet over for 5 seconds without touching.


As it was my first time I wanted to try out all the designs (I used the Barry M magnet too and it is as good.) I had difficulty getting it close and not toughing the nail at first as you can see from the magnet. I think the trick is to be careful when placing the magnet down. I was a little too eager.


I really did love all the designs. Especially the star one. It looks so cute. I really do like the way it looks on the nails and the shimmer is so pretty.


Have you tried Magnetic polishes? Which brands are your favourites? Do you like the way it looks? 

Love M

xxx

SHARE:
© The CSI Girls. All rights reserved.
Blogger Designs by pipdig