Friday 21 December 2012

Nail Splurge!


I'm sure you can imagine after getting myself a discount card at Boots I have been putting it to good use.

The other day I went in to pick up a few things before my shift started and the things I wanted weren't in stock (boooooooooooooooo!)
Clearly this meant that I had to buy 8 nail varnishes and some nail wraps instead.....oops?!

I'm not quite sure what happened to my logic during that decision as the other items were ones that I needed, and still need.
But it was too late at this point so I'm just enjoying my new polishes!

Here's my haul......


Having only bought one Essie polish before (Sand Tropez, read here) I needed more in my collection.

Having heard so much about Ballet Slippers that was first in my basket, then I saw the Winter 2012 collection was was won over by the sparkle.
This was when the sparkle went to my head and I became drunk on nail colours.
Suddenly Lovie Dovie (the pink), Chinchilly and the Top Coat were added to my basket before I'd even blinked.
After breaking a nail half way down my nail and coincidentally having to keep painting it so it doesnt snap and bleed (ouuuuucccchy!) I also bought the Sally Hansen Hard as Nails Hard as Wraps in an effort to stick it back together as a temporary aid whilst it grows out.

The nail wraps were also a spontaneous buy that I will be saving for after Christmas when I won't be opening boxes all the time and potentially ruining them.


Just look at those colours!

I will be doing a separate post on these coming up shortly I would imagine.
Leading Lady is a beautiful colour and perfect for this time of year, whilst Snap Happy and Beyond Cozy are obvious party season choices!

This would be the perfect stocking filler and I wish I'd bought more of them in other years, assuming they existed.
I'm new to the Essie hype and am completely loving it!

Essie

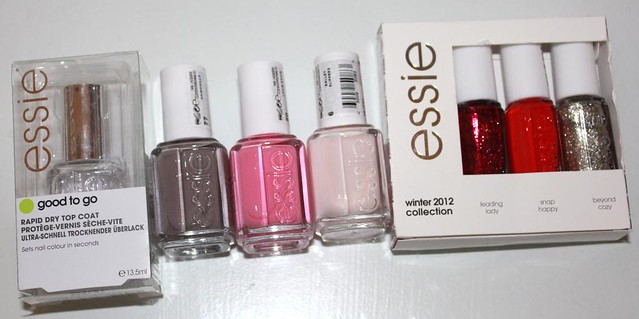
These are all my Essie purchases bringing my total now to 8 from this particular brand, and I am yet to find one I don't like!
I can see my discount getting used quite a considerable amount.....eek!

Painted Lady

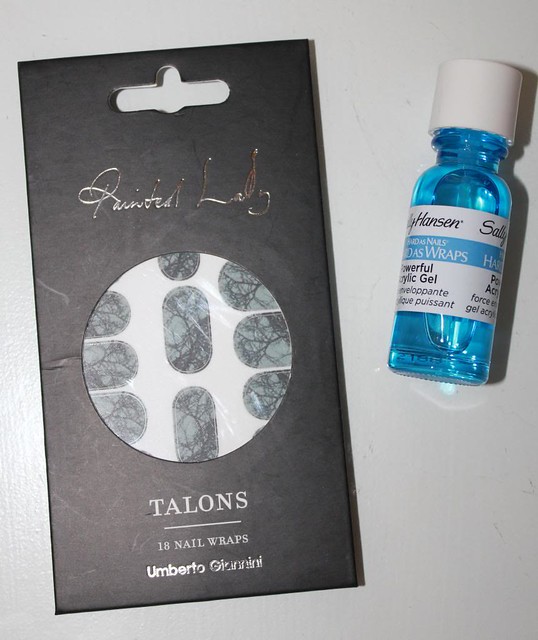
I always hear 'Painted Lady' on the tannoy but I have to admit I hadn't heard much about them.
When I did walk past them I was amazed, there was such a good choice of patterns and colours!

It took me a good few minutes to decide but as I've never used them before I made myself choose one as I also don't know how they will fare with my job being so demanding on my manicures.....it's inconvenient!

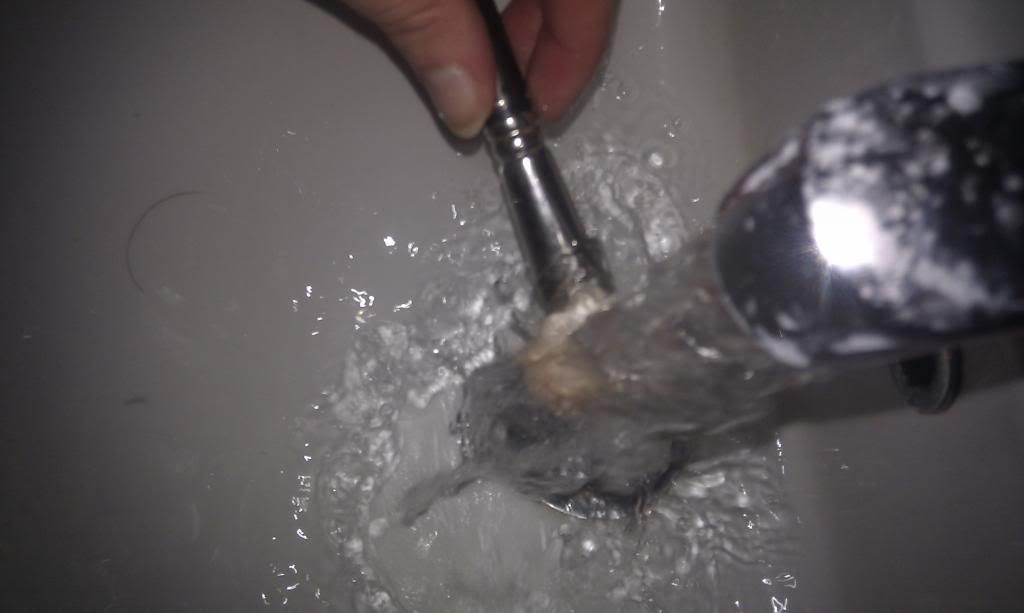
Sally Hansen is yet to fail me with her range of affordable polishes for every ailment imaginable so I am hoping this will stick my nail back together and stop it from coming off/splitting any more until the time comes when I can cut it off myself.

I have heard the tea bag technique can work wonders....can anyone comment on this? 
I would love to know if it can work!
My broken nail is on my middle finger and although it doesn't hurt yet it has snapped across half way and would likely bleed everywhere if it did break further. Siiiiiiiiiiiiiiiiiiiiiiigh.

How do you like my impromptu splurge??
I felt so naughty buying them as I really cannot afford to buy unnecessary items so I've had to hide them from my parents ha!

What's on your Christmas list from Essie? 

L xxx
SHARE:

Thursday 20 December 2012

My Top Tips to Clean Make Up Brushes

I was going to write a post on how I clean my make up brushes but I thought I would include a link to a video by two girls who run a blog and YouTube Called A Brunette Duet. You can view the video by clicking here. They have some great videos I enjoy watching their tips. I've always followed a few tips when cleaning by brushes and after watching this video I've change how I clean my brushes to the same as this. This is a great video!

Cleaning brushes is important. Make up applies better on clean brushes, there is less chance of spreading bacteria around and it keeps your brushes in good quality.

When I first starting looking into the best way to clean make up brushes one of the top tips I always stick to is to make sure that you dry your make up brushes upside down. Having them lied flat of stood up in a pot means water can go into the handle of the brush and dry there and start to disintegrate the glue or handle and mean it could fall of quicker. 


I used to tie my make up brushes in a hair band and hang it from a door handle so that they would be secure upside down. I'd leave them like this for a day so they were completely dry.

After watching the girls video mentioned above I know roll a hand towel and lie it down so I can rest the brushes on and angle so the water doesn't go in the handle.


Nice clean brushes lied on the roll so the water comes out!1 These are the brushes I was most weeks.

I found my RT stippling brush the hardest to clean. With foundation brushes I think patience is needed to ensure it really is clean. I find it takes about 4 soaping and rinsing to get it really clean. I squeeze right at the top of the brush and don't stop till the water runs clear.


I currently use baby shampoo (but would love suggestions as my foundation brushes are feeling greasy and not clean anymore after they've dried) I place it on the back of my hand. Massage the shampoo through then rinse well and repeat if it's not clean.

I really want to try a proper brush cleaner and the ELF one seems reasonable so would love to know if you've used it before or if you have any cheeky ELF discount codes.

I try to do my brushes every Sunday night. I find getting into the habit of doing them on a Sunday easier. As I always think of it as a chore but it doesn't take that long once I'm set up.

During the week I have two foundation brushes I currently use as I find a foundation brush won't stay clean for a week. Also for foundation and eyeliner brushes I always wipe them clean with a make up wipe so they stay a bit cleaner.

I hate waiting for brushes to dry! They seem to take forever. I've now started drying them carefully with a towel before letting them air dry completely.

With my make up brushes my three top tips would be
  • Always leave them to dry upside down or on an angle
  • Wash till the soap suds are clear. Some brushes need more than one lot of soap
  • Wipe clean after use for foundation and eyeliner brushes. It means I can get away with washing mine weekly.
I'd love to know how you clean your brushes and what are your make up tips. Especially anyone with a real techniques stippling brush as mine causes me the most problems.

Love M

xxx

SHARE:

Wednesday 19 December 2012

Skinetica Part 1

If you're a regular reader of our blog you'll know that I've been stressing out about my skin problems for a good few months now.
I have never had perfect skin as I've suffered with the monthly break outs and the occasional few extras due to nights out, bad food etc. but it hasn't ever really been that bad either.

After spending a few weeks in the sun in America in May/June my skin was as good as it's ever been.
Largely due to an active outdoors kind of lifestyle with lots of water, no make up and a hell of a lot of showering (I spent lots of time digging in mud!)


This was at the airport on the way back where I am completely make up free (maybe mascara but that's it!) and although the photo isn't the best you can clearly see that I have almost no blemishes whatsoever.

Ever since I got back my skin has gone downhill to the point where I can officially say that I have acne, most probably caused by stress according to skin consultants.

Having never suffered this badly with it I've struggled to find products to deal with the outbreaks and with the scarring.
Alpha H Liquid Gold was great for helping with the monthly outbreaks that I get and helped the rest of my skin which is unaffected look more luminous and even in tone, however it didn't help to stop the outbreaks.

I've used face oils from Antipodes which have helped with the scarring (thank god!!) and also the monthly outbreaks, but again, not the cysts appearing along my jawline and cheeks.

Lastly I've been using face masks from Origins including the Out of Trouble mask and Clear Improvement, both of which have helped minimise the outbreaks but nothing seems to go to the root of the problem.

After 5 months of trying nothing and hoping it will go away, to slowly changing everything from cleansers to masks to moisturisers to oils, and assessing some other lifestyle issues such as stress, diet etc there was nothing else I could do.

Or so I thought.

The lovely Georgina from MakeUp-Pixi3 got in touch with me about a company who had a product that could help and so obviously I said yes.
I had my reservations that anything could help at this point, but I was prepared to give it a go.

So now it's time for me to show you my skin.....this was the hardest thing to take pictures of my skin and post them up so I hope you'll understand for me this was terrifying. (And sorry for my horrible skin)


You can clearly see how horrible, red and sore my skin and spots are all over my cheeks and jaw line.

The most painful ones being the 2 pictures side by side which were taken a few days apart and show minimal difference in healing time.

I've cried over it so many times you wouldn't believe.
I love putting on make up every day but trowelling it on in order to cover it up (like in the photo below) wasn't what I meant:


THANK GOD FOR MAKE UP. 

Luckily for me my forehead and nose area have been unaffected as of yet and so a combination of using make up and keeping my hair down to cover the sides of my face masks it for the most part.


Hopefully after those pictures you're still with me.

After a few emails with the contact from Georgina, 1 day later I received a package in the post containing a bottle of product.
You may recognise this if you've ever received Glossy Box, as it was a recent product in the November box (I think?).
It is of course Skinetica*:


Previously known as Acnigon, their website claims: 

A unique new solution that clears unsightly breakouts with visible improvements in 2-3 days.
  • No harsh chemicals
  • No side effects
  • Kind to skin
  • Dermatologically tested
  • Non Toxic, non staining, non greasy
  • Purchase online - order yours here


As you'll know, were big fans of minimal usage of harsh chemicals and environmentally friendly ones are even better.
Obviously, having these and also the desired effects is the icing on the cake so as long as it works this sounds like a pretty promising bottle of joy!


It was really simply to use, just apply to clean dry skin with a cotton wool pad and allow to dry.
After this you can apply moisturiser and make up as normal.

I was worried in case any of my moisturisers or oils reacted with the Skinetica solution but actually it didn't.
Not with my hydrating moisturisers or with oil reducing day ones, nor oils made with natural products.
Another bonus point!


If you include this as part of your every day skin care routine it's super easy to use.

The only thing that bugged me a little was the inclusion of fragrance in the ingredients.
I didn't notice any particular smell from the solution which made me wonder why it was there in the first place.
If it doesn't make a difference it doesn't need to be there!

The price is also great. At £6.99 for 100ml (£9.99 incl P and P) this product falls into the cheaper end of the market. Particularly as the more you buy, the cheaper it gets.
6 bottles are just under £38, which means they come in less than £5.85 with postage deducted.

So I've decided to reveal the results in an upcoming post.
My babble has reached a ridiculous length in this one post and I wanted to fully show the results after 1/2/3 weeks of use of Skinetica.

I will tell you now though....it is a positive review!


Have you used Skinetica? What were your results?

Check back next week for my results post!

L xxx
SHARE:

Tuesday 18 December 2012

FOTD - Step by Step Make Up

After seeing a FOTD on Palindrome Poppet's blog I liked that she did it step by step and showed the before and after photos. I decided to do something similar on my go to comfort everyday look. For me this is what I do when I can't be bothered with my make up and it takes me about 15 minutes to do.


This is the first photo I've put on the blog completely make up free. Please ignore my hair I hadn't done that yet either and it's fading unevenly.


What a difference a bit of make up makes!


On my face I used 
  • Sleek blush by 3 in lace. I used the red shade
  • Benefit Erase paste in Shade 1
  • Miss Sport bronzer (I've lost my favourite No7 blush in honey)
  • Mac Studio Fix Fluid in shade NW15
  • Revlon PhotoReady powder in translucent.


I really love the finish of Studio Fix. It really evens out my skin tone, covers and imperfections and leaves a natural semi matte finish to the skin. This definitely beats my old love of Prolong wear.


On my eyes I used
  • From Naked 2 Palette: Bootycall and Tease
  • Maybelline Gel Liner
  • Avon Super Magnify
  • Lancome Hypnose Doll Lashes
  • Eylure Shape and Shade brow pencil

Firstly I apply my Erase paste reviewed yesterday to under the eye and over my lid as an eyeshadow base. I apply bootycall all over my lid and then blend tease into the crease. I really love tease. It's the perfect crease colour and looks amazing blended out.


For this look I always used gel liner. I love gel liner and wear it most days. I find it much easier to work with than any other type. I find the maybelline last extremely well all day. I start of with a thin line and blend it towards the outer corner of my eye. With this look I don't wear anything on my bottome lases. Just a bit of bootycall blended into the tear duct.


Next is lashings of mascara. I apply the Avon one first to separate my lashes, then my Lancome one on top to define and volumize.


I use the Eylure pencil to fill in my brows and give them some shape. I'm still learning and have now bought Brow Zings which I'm hoping will make me better at my brows.


For blush I apply a bit of bronzer to the hollows of my cheeks to make it look like I have cheek bones. Then I apply a small amount of the red from my sleek palette to the apples of my cheeks. This blush is so pigmented I have to use a light hand.


These are my go to brushes. The Avon one is what I use for Gel Liner and is the best of the best for gel liners. The accessorize brush was a brush my mum gave me from a set. I use it to put shimmer into my tear ducts. Then My Real Techniques Stippling Brush. The next brush is actually a lip brush I recently picked up in M&S for 25p it's great for blending out the crease (which I use the brush from my Naked 2 palette to apply). Then the jolie box conealor brush. I like to blend my Erase paste in with this. FCUK blush brush. This is the softest brush ever. The Mac 168 I use to contour. It's amazing and lastly is an avon fluffy brush I use to apply bootycall.


And last but not least my No7 lip liner in plum and Mac lipstick in Plumful. I love this shade. It's a perfect pink colour. Followed by a gently powder with my Revlon PhotoReady.

And that's my go to make up. Seems a lot when I describe it.

What do you think of step by step FOTDs? Do you prefer them like this or is it too photo heavy for you?

Love M

xxx


SHARE:
© The CSI Girls. All rights reserved.
Blogger Designs by pipdig